
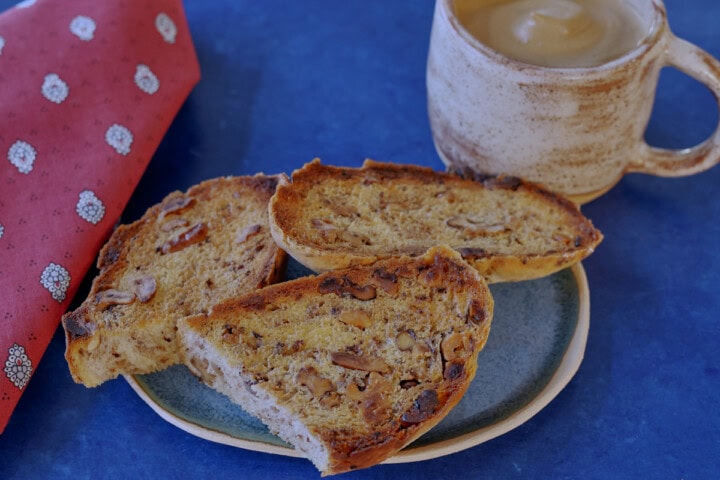


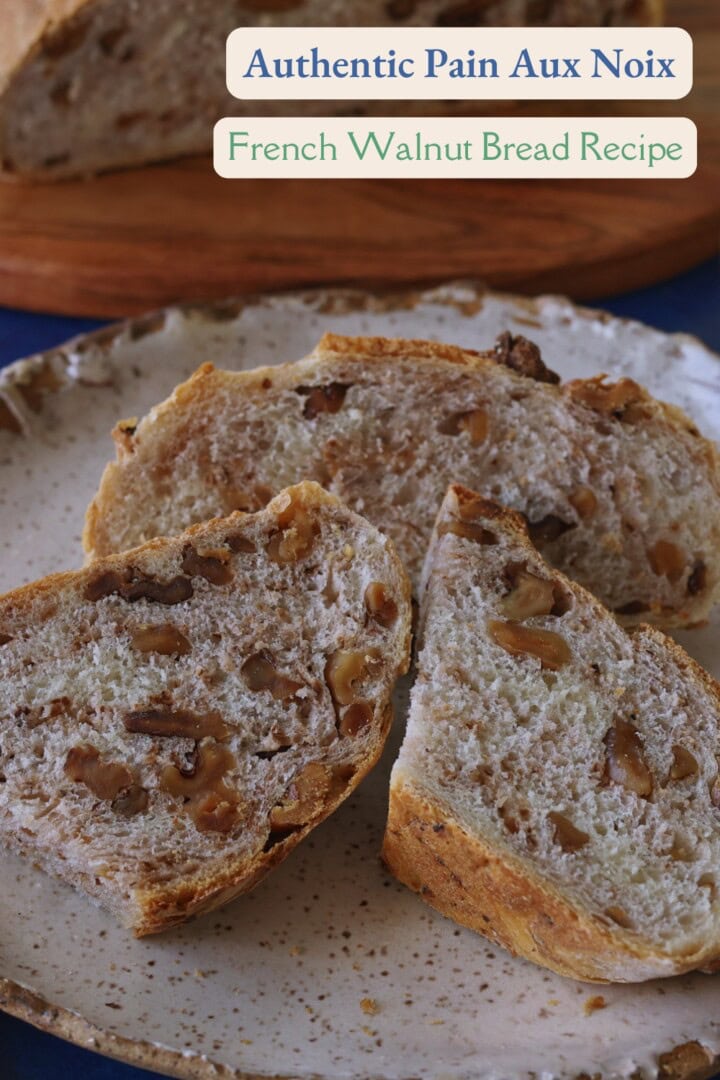
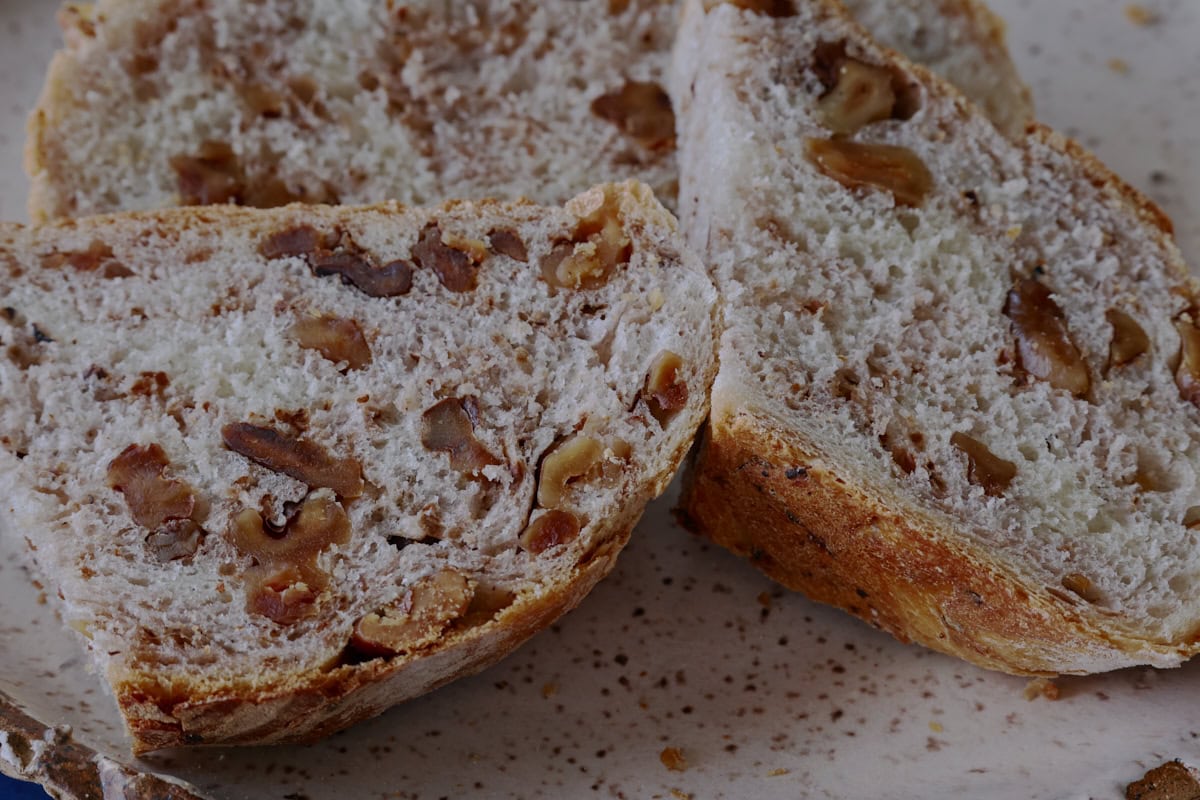
🌱French pain aux noix (pronounced pahn oh NWAH) is one of my favorite breads of all time. I've been known to eat half a loaf in one sitting, and then stumble around in a stupor, clutching my gut and moaning with gustatory excess. But it's so worth it! This hearty, rustic, and traditional French bread is dense, chewy, and studded with toasted walnuts. And it's naturally plant-based. It's the perfect bread for a cold weather day, or any time you need something with deep flavor and heft to make you feel cozy and sated. It's delightful plain or toasted, and it just may make you roll around in gastronomic satisfaction too. Maybe just don't eat half the loaf at once like I've done so you can still walk. The prep for this irresistible bread takes a little time, but most of this is passive waiting time. It's so worth making this Authentic Pain Aux Noix (French Walnut Bread) Recipe. You're going to love it!

This bread is rooted in centuries of rural farmhouse French baking tradition from the walnut-growing areas of Périgord, Quercy, Corrèze, and Grenoble. The loaves have traditionally included local walnuts and oil from nut pressing. This bread became a valued bakery staple in the 19th and 20th centuries as regional breads made their way into larger towns and cities. Today, this pain aux noix is a recognizable French specialty that's connected to the culinary heritage of the historic walnut-producing areas.
Jump to:
💕Why this recipe is special
Deeply tied to French heritage
Walnuts have been part of the French culinary tradition for centuries. Pain aux noix is a simple celebration of daily life and farmhouse baking that brings out the best of this special and flavorful nut.
Distinctive flavor and texture
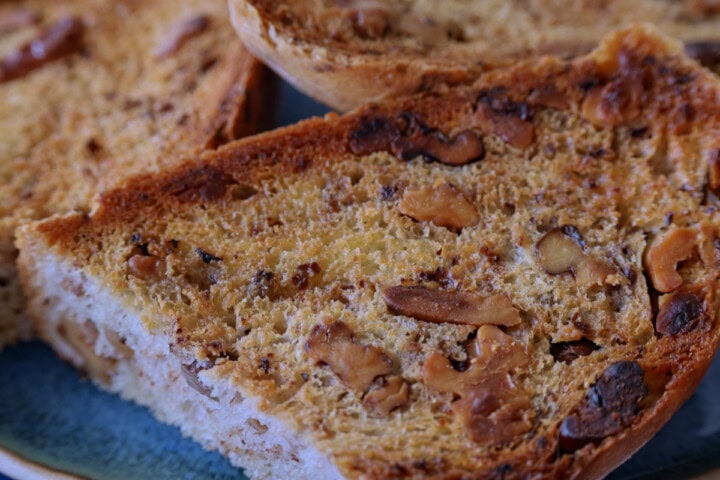
The toasted walnuts add hearty warmth and nutty aroma that take this bread to the next level compared to plain loaves. And the nuts themselves are comforting and satisfying to chew and savor.
Works with both savory and sweet foods
Walnut bread is so versatile. It's deeply flavorful and satisfying on its own, and also pairs beautifully with savory foods from plant-based cheeses, tapenade, and butter to roasted vegetables and soups. And it also pairs just as wonderfully with sweet foods like fruit preserves or alongside simple fresh fruit. This bread is flexible in a wide array of food settings.
Gorgeous texture
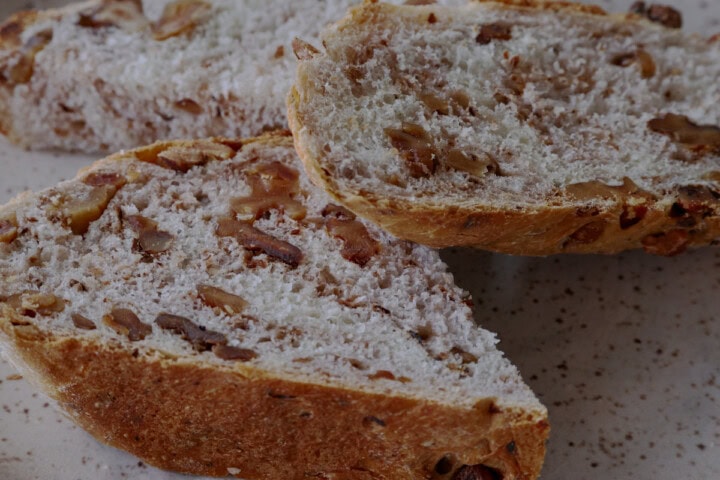
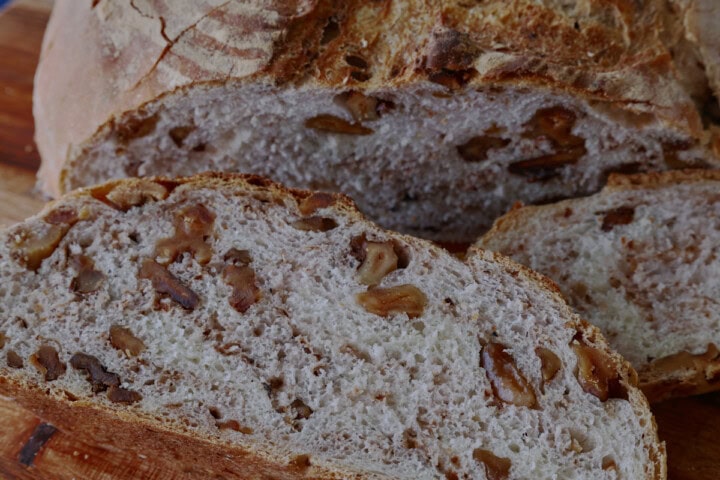
The texture of pain aux noix is so deeply fulfilling: tender and chewy, comforting and hearty with the gentle crunch of toasted walnuts. The aroma and flavor are out of this world!

📓Ingredient notes
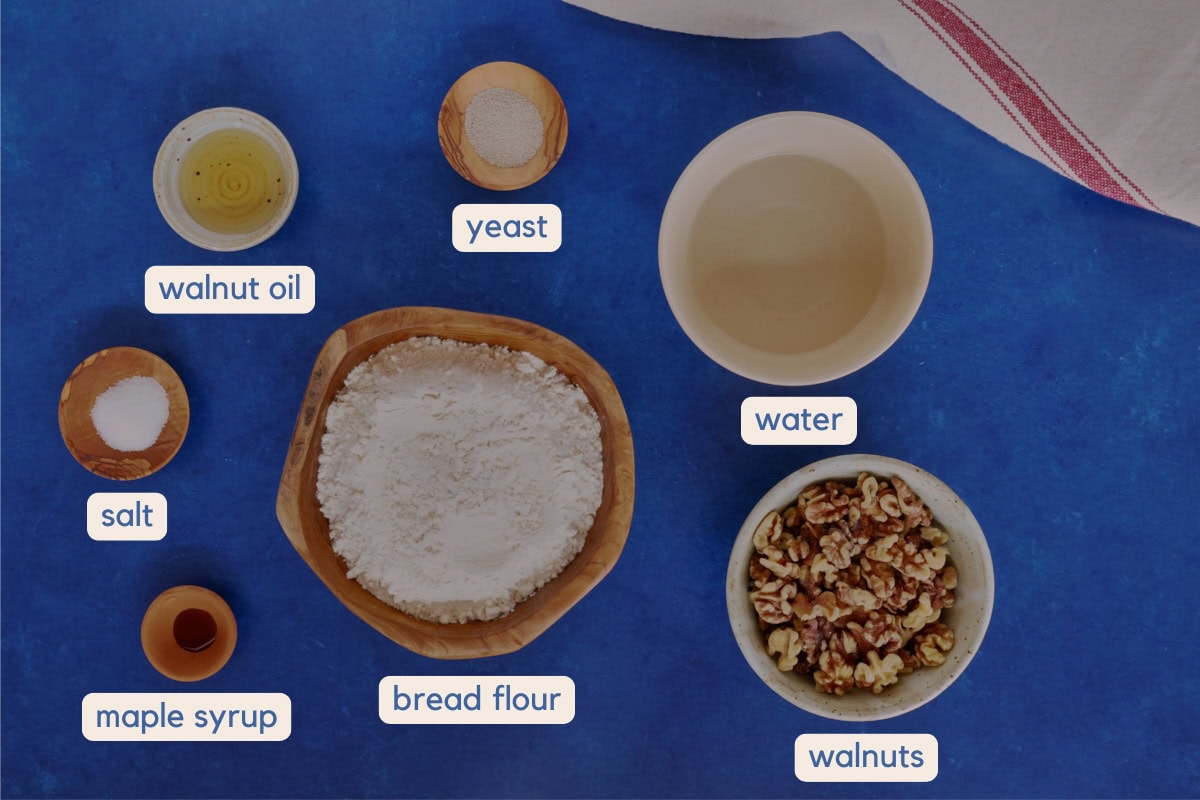
- Walnuts: Use halves or quarters; there's no need to chop them, since we want large pieces in this bread.
- Water: We add the water at 105-110 °F / 40-43 °C to give the yeast a chance to bloom to its full potential.
- Yeast: The best yeast for this bread is active dry, as it gives the dough time to rise and build up optimum flavor and strength.
- Salt: Fine sea salt works well here, as it dissolves quickly into the liquids when blooming the yeast.
- Walnut oil: You can substitute another oil (or omit oil entirely), but I highly recommend using this oil for the optimal flavor in this bread.
- Maple syrup: I'm using this to help boost the yeast. You can use sugar instead or omit this completely.
See recipe card for quantities.
📒Step by step instructions & photos

- Step 1: Toast the walnuts until golden and aromatic. Let cool.

- Step 2: Combine the yeast and liquids and allow to bloom for 5-7 minutes.

- Step 3: Add in the flour and mix just until combined. Allow to rest for 10 minutes.

- Step 4: Mix the dough for 5-6 minutes in a stand mixer or knead for 10-12 minutes by hand.

- Step 5: Add the walnuts gently just until evenly combined.
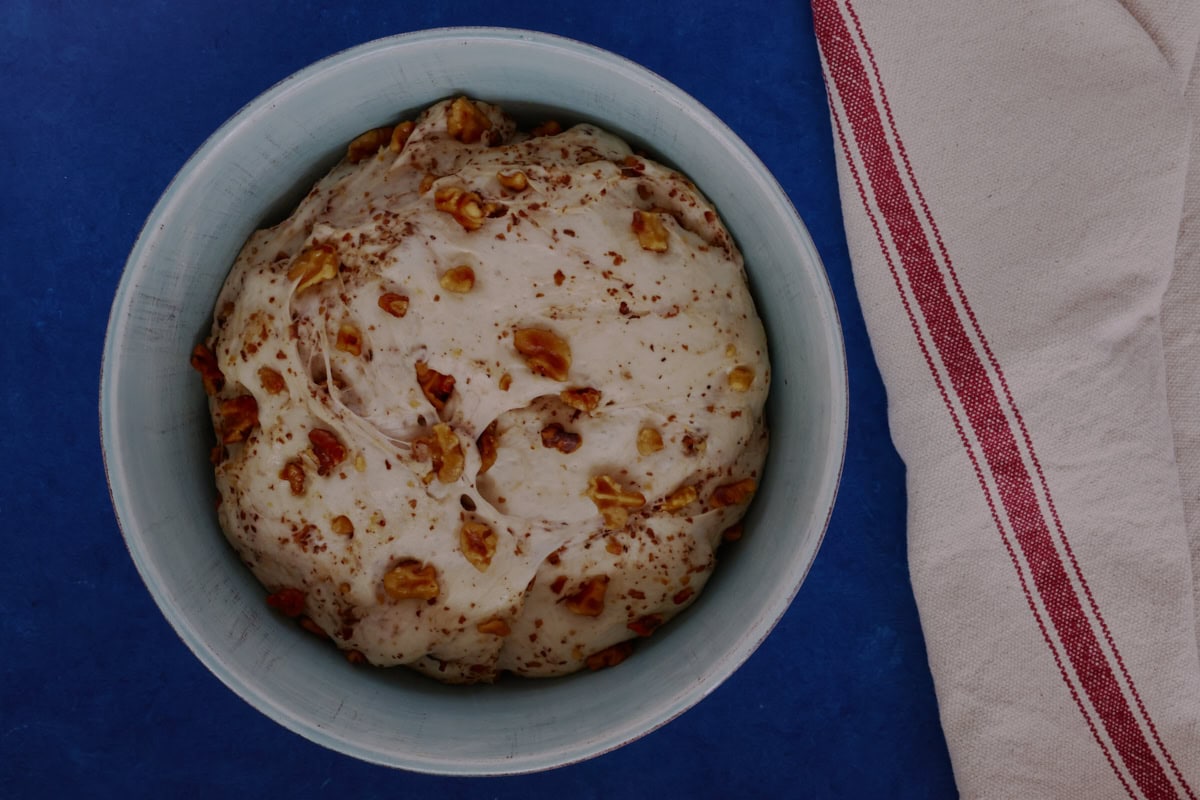
- Step 6: Transfer the dough to a lightly-oiled bowl, cover, and let rise for about 90 minutes until around 1½ times its original size.
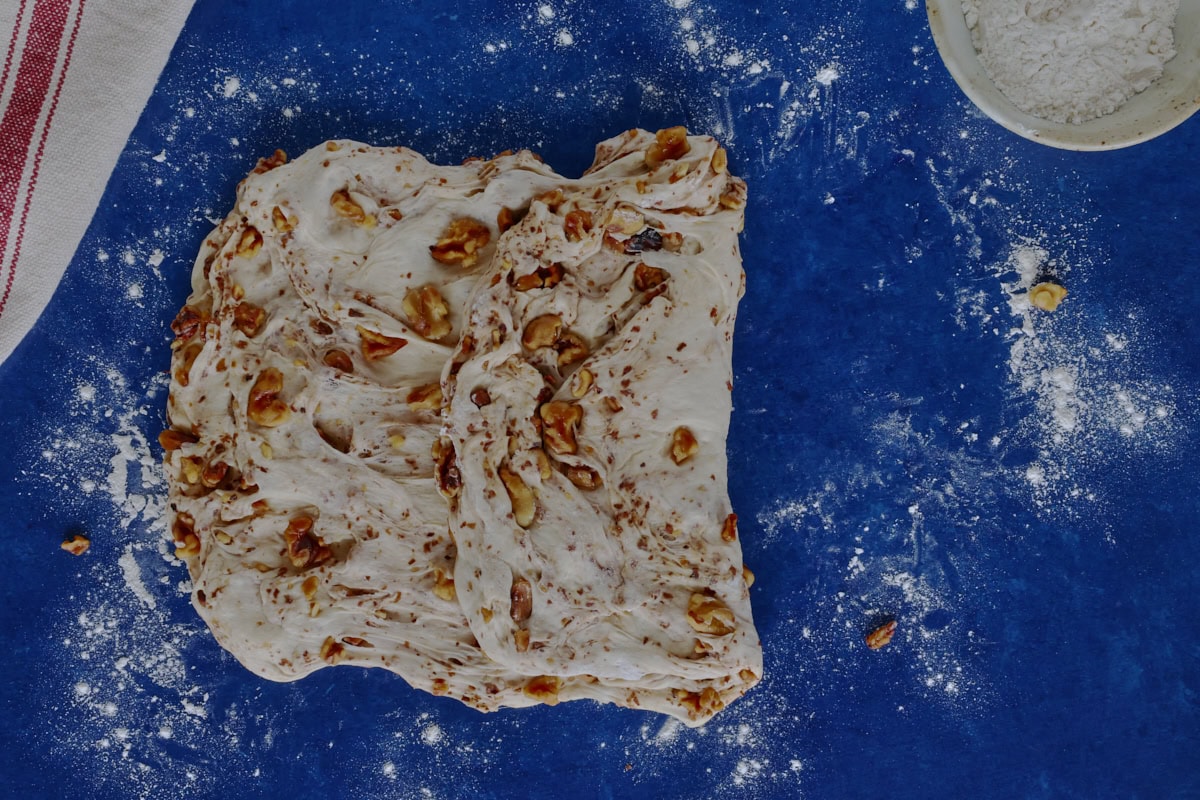
- Step 7: Pat the dough into a rectangle, and fold one side into the center.

- Step 8: Fold in the other side like a letter.
- Step 9: Roll up the dough into a boule.

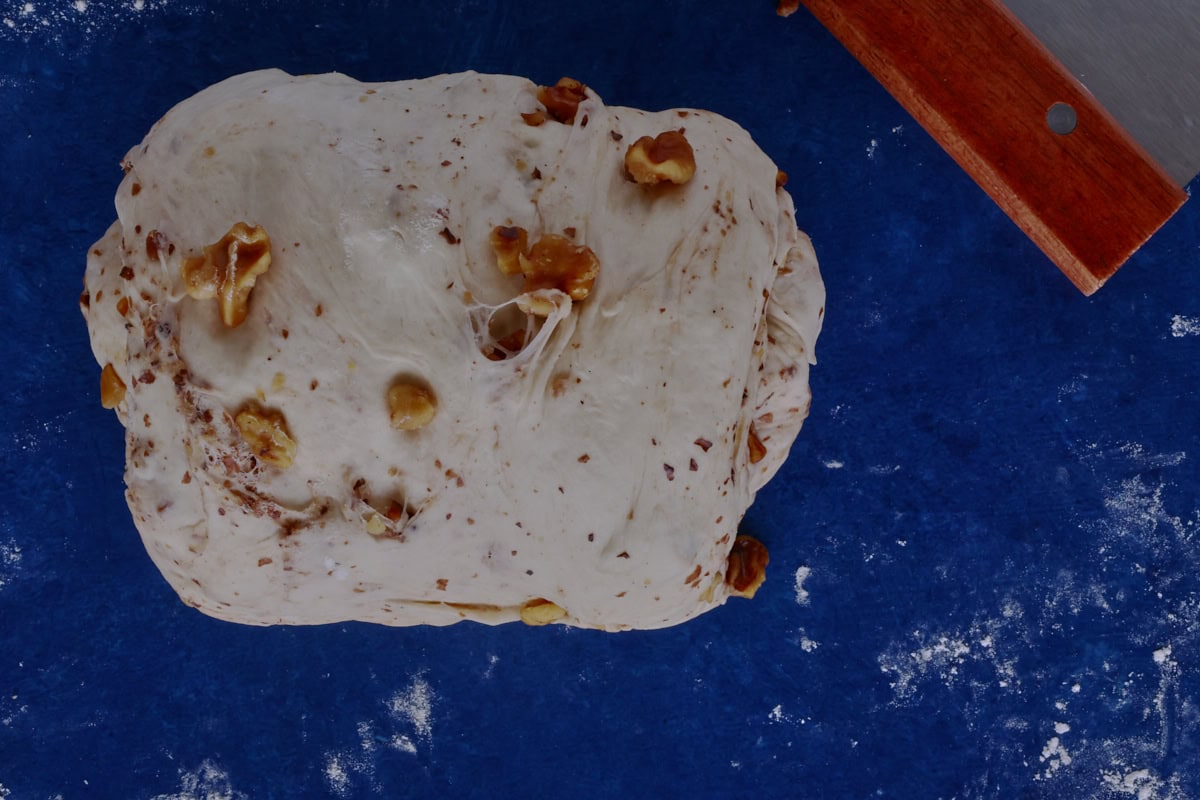
- Step 10: Build structure and tension into the loaf by tucking the sides down and under as you rotate the dough. Pinch the bottom seams together tightly.

- Step 11: Place the dough into a floured banneton (bread proofing basket) or on parchment paper on a baking sheet. Cover and let proof for 45-60 minutes. Preheat the oven for 30 minutes with either a Dutch oven or baking stone/steel. (See baking options 1 and 2 in recipe card for details.)

- Step 12: Turn the dough out onto a silicone bread sling or parchment paper.

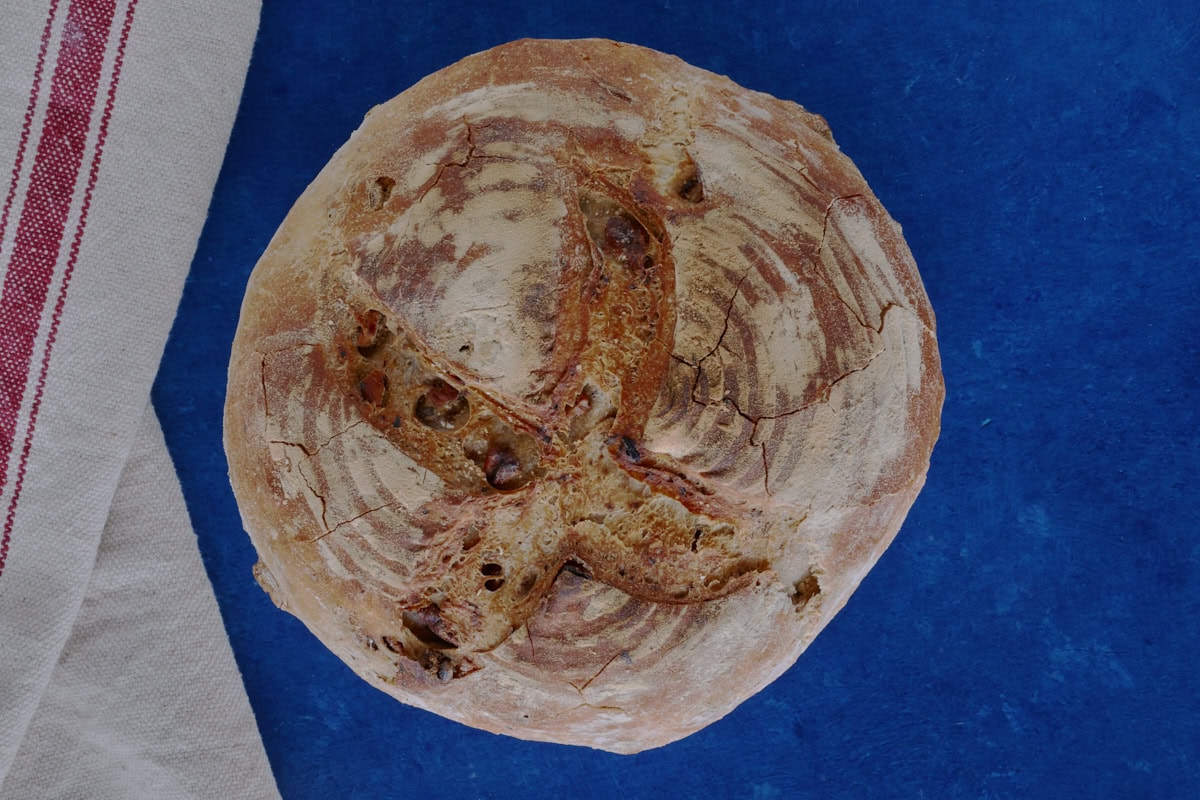
- Step 13: Score the loaf about ½ inch (1.3 cm) deep.

- Step 14: Carefully lower the dough into your Dutch oven (option 1) or place on parchment on the baking stone/steel (option 2). Bake per the details for each option in the recipe card.
- Step 15: Let your bread cool for at least an hour before cutting. Enjoy!
Hint
💡Tips for success
Walnuts
Toast the walnuts fully and let them cool completely before using. There's no need to chop them, as we want large pieces in this loaf.
Dough shaping
Build the tension in the loaf gently to help develop the best potential for the height and crumb we're trying to attain.
Dough scoring
Score the dough deeply enough (about ½ inch (1.3 cm) deep) to allow the dough to expand cleanly and along the lines of your choosing.
🔀Substitutions
Walnut oil
If you don't have walnut oil on hand, you can substitute olive oil, hazelnut oil, grapeseed oil, or sunflower oil. Or you can even omit it entirely.
Maple syrup
I'm using this to help boost the yeast. If you don't have maple syrup, you can use a pinch of sugar or omit this entirely.
Bread flour
If you don't have this type of flour, you can use all-purpose flour. However, this may cause the loaf to spread a little more and rise a bit less. And you may need 1-2 tablespoons extra during kneading until the dough has a soft, tacky feel.

🍶Variations
Raisins (pain aux noix et raisins secs)
If you'd like to try adding some raisins to the loaf, soak about ½ cup (60-80 g) of them in water, pat them dry, and add them during the walnut addition step.
Whole wheat (farine complète) addition
Pain aux noix is often made with a small percentage of whole-grain or stone-ground wheat flour; not enough to make it whole wheat bread, but enough to heighten the rustic flavor of the loaf. The recipe should still work reliably if you replace 10-20 percent of the flour with whole wheat flour. At 10 percent (45 g), hydration remains the same. If you'd like to substitute 20 percent (90 g), you may want to add 1-2 teaspoons more water during kneading if the dough feels a little too firm.
Mini boules or rolls
These would be adorable for a dinner party or with appetizers. Shape the quantity of dough in the recipe into 6-8 small boules and bake them for 18-22 minutes at 350-450 °F is 177-232 °C or until golden, fragrant, and firm.

🥣Equipment
- Digital scale: This makes it easy to accurately measure the ingredients, and leaves you with fewer dishes to do at the end!
- Baking pan: For toasting the walnuts, and adding water for steam if baking with a stone/steel instead of a Dutch oven.
- Measuring cups and spoons
- Digital thermometer: To measure water temperature.
- Whisk
- Stand mixer with dough hook
- Plastic wrap or silicone stretch lid
- Bench scraper
- Banneton (bread-proofing basket): I've used a 9 inch (23 cm) banneton when making this recipe. Or you can bake your loaf without this. Your loaf will likely spread more and spring less. But it'll still taste great.
- Parchment paper or silicone bread sling(s): I've used 2 silicone bread slings when making this bread, stacked with the arms perpendicular to one another (like in the step-by-step photos) to make lifting the dough easier.
- Dutch oven with lid or baking steel/stone and baking pan: (Please see baking options 1 and 2 in the recipe card for how to bake with either of these.)
- Cooling rack

⏲Make ahead and storage
Make ahead
Pain aux noix actually improves in flavor the next day. The walnut aroma and flavor bloom, and the crumb firms slightly in an enjoyable way. So this is the perfect bread to make the day before you need it.
Room temperature
Let the loaf cool fully, and keep it in a paper bag inside of a loosely-fastened plastic bag, or wrapped in a clean kitchen towel. Avoid an airtight container, as this will soften the crust and dull the flavor. And slice only as needed. Slicing in advance makes artisan bread become stale faster.
Refrigerate
Refrigeration of artisan bread isn't ideal, because it will make it become stale faster, and make the loaf dull and firm. I don't recommend doing this.
Freeze
Walnut bread freezes surprisingly well. The natural oils in the walnuts help to protect the crumb from drying. To freeze this bread, allow the loaf to cool completely. Wrap it tightly in plastic wrap, and then aluminum foil. Freeze for up to 1 month. To thaw, unwrap completely and thaw at room temperature. And then, to make a freshly-baked crust, place the loaf in a warm oven at 300 °F (150 °C) for 10-12 minutes. This will crisp up the crust without drying out the crumb. Let the loaf rest for 5 minutes before slicing.

🍲Serving suggestions
Soups
Soup and bread go hand in hand, and this bread is perfect for dipping into your favorite bowl of soup. This bread goes particularly well with my Rustic Vegan French Sorrel Soup (Soupe à l'Oseille)
Salads
This pain aux noix really stands up well to a delicious salad. My Spinach Arugula Salad with Black Garlic Vinaigrette is a perfect complement on a cold day when you're looking for something really cozy and satisfying.
Roasted or grilled vegetables, and many more
Walnut bread pairs wonderfully with savory dishes of all types, including vegetables, grains, pasta, and many others. Try it with my Easy Vegan Pasta with Garden Heirloom Tomato Sauce Vierge or my Heirloom Carrots with Chermoula (Carottes à la Chermoula) for a captivating meal.
Plant-based cheeses, tapenade, butter, or hummus
The sky's the limit when adding this bread to round out an appetizer board, dinner party selection, or as an accompaniment to sauces and spreads of all types.
Fruit preserves or simple fresh fruit
This bread is fabulous in sweet food settings as well. It's perfect toasted for breakfast with fruit or jam, or with other sweet spreads. Enjoy!

❓FAQ
Pain aux noix is a delightfully flavorful rustic loaf of French country bread with toasted walnuts mixed throughout the dough. It originated in the walnut-growing regions of France, and has been a special artisanal bread there for centuries.
It has an aromatic, hearty flavor from the toasted walnuts, and a chewy and tender firmness in the crumb. It's subtly earthy and flavorful. And it's also incredibly comforting and satisfying.
Unbleached bread flour with a protein content of 12-13 percent will yield the best structure in the loaf to support the weight of the nuts and rise well. If you'd like a nuttier, more rustic flavor, you can replace 10-20 percent of the bread flour with whole wheat flour. (At 20%, you may need to add an extra 1-2 teaspoons of flour when kneading if the dough is too firm.)
No, you don't have to use it, although it adds a wonderful depth of flavor. You can substitute olive, hazelnut, grapeseed, or sunflower oil, or you can omit the oil entirely.
Yes, walnut bread freezes exceptionally well. Just wrap the cooled loaf in plastic wrap and then aluminum foil, and unwrap completely to thaw. And then you can warm it (still unwrapped) in the oven at 300 °F (150 °C) for 10-12 minutes to revive the crust.
When the pain aux noix is done, the crust will be deeply golden and firm, and will sound hollow when tapped. And the aroma will be enchantingly nutty and well-toasted.
Yes, you can knead the dough by hand instead for about 10-12 minutes until it's smooth and elastic. It should feel soft, slightly tacky, but not sticky. And it should pull into a thin windowpane (with light showing through) when stretching a walnut-sized piece.
✨More recipes you'll love
Looking for other recipes like this? Try these:


✏️Did you make this recipe?
Please let me know in the reviews and comments below!

Authentic Pain Aux Noix (French Walnut Bread) Recipe
Ingredients
Walnuts
- 1½ cups (180 g) walnut halves or quarters
Liquid mixture
- 1¼ cups (300 ml) warm water (105-110 °F / 40-43 °C)
- 2 teaspooons (6 g) active dry yeast
- 1¼ teaspoon (8 g) fine sea salt
- 1 tablespoon (15 ml) walnut oil, (or can substitute with olive, hazelnut, grapeseed, or sunflower oil)
- ⅛ teaspoon maple syrup, (for yeast boosting; can substitute a pinch of sugar or omit entirely)
Flour
- 3¾ cups (450 g) unbleached bread flour, 12-13% protein
Instructions
Toast the walnuts
- Preheat the oven to 325 °F (165 °C). Add the walnuts to a baking pan in a single layer.
- Toast the walnuts, tossing as needed, until lightly golden and aromatic, about 10-14 minutes. Allow to cool completely.
Mix yeast and liquids
- In the bowl of a stand mixer, add the warm water, yeast, salt, walnut oil, and maple syrup.
- Whisk until combined and the salt is dissolved. Let rest for 5-7 minutes until the mixture is slightly foamy.
Mix in the flour
- Add the flour to the mixer bowl. Mix on the lowest "stir" setting for 2 minutes (or mix by hand) until no dry flour remains.
- Scrape the sides of the bowl as needed. Cover with plastic wrap or a lid and allow to rest for 10 minutes. The dough will look rough and feel soft, but not sticky.
Knead the dough
- Knead on mixer speed 2 for 5-6 minutes (or by hand for 10-12 minutes) until the dough is smooth and elastic. It should clean the sides of the bowl but may cling lightly to the bottom. If too dry, add water 1 teaspoon at a time; if sticky, add flour 1 teaspoon at a time.
- To test for doneness, do the windowpane test: pinch off a walnut-sized piece of dough and stretch it slowly; if you can see light through the dough before it tears, the gluten is developed.
Add the walnuts
- Sprinkle the cooled walnuts over the dough. Mix on the lowest stir speed for 45-60 seconds just to distribute. If the walnuts don't incorporate well this way, it may be easier to quickly knead them in by hand. Stop when the walnuts are evenly mixed in, and the pieces remain large.
- Cover with plastic wrap or a lid and let rest for 10 minutes.
Bulk fermentation
- Transfer the dough to a lightly oiled bowl. Cover with plastic wrap or lid and ferment about 90 minutes at about 70 °F (21 °C), until the dough is soft, puffy, and has risen to about 1½ times its original size.
- (You can do an optional fold at 45 minutes for extra strength: lift one edge and fold it into center; repeat on all 4 sides.)
Shape
- Lightly flour the counter and turn out the dough. Pat it gently into a rectangle, and fold one side like a letter into the center. Fold the other side over the first, and then roll it up to form a tight boule.
- Build structure and tension by pushing the sides down into the bottom as you rotate it. (It may be helpful to use a bench scraper to help you push the sides under as you go.) Continue to rotate for a minute or so, tucking the sides under until the boule has some firm tightness. Turn the boule over and pinch the seams tightly together.
- Place seam-side up in a floured banneton (or seam-side down on parchment paper in a baking pan). Cover with plastic wrap.
Final proof
- Let the dough rest for 45-60 minutes at room temperature. A gentle finger press should spring back slowly, leaving a slight indentation. This means it's ready to bake.
Bake
Baking option 1 - Dutch oven (yields best bottom color)
- Preheat a dutch with its lid to 475 °F (245 °C) for 30 minutes.
- Place the dough seam side down onto silicone bread sling or parchment. Using a baker's lame or sharp knife, score the dough about ½ inch (1.3 cm) deep, lower into the pot, and cover with the lid.
- Bake covered for 20 minutes. Reduce the heat to 425 °F (220 °C), and bake uncovered for an additional 18-22 minutes until deeply golden with a firm crust. The bottom should sound hollow when tapped.
Baking option 2 - Baking stone/steel method
- Place a baking steel or stone on the lower-middle rack, and add an empty baking pan with sides to the rack below. Preheat to 500 °F (260 °C) for 30 minutes.
- Add the loaf to a large piece of baking parchment. Using a baker's lame or sharp knife, score the dough about ½ inch (1.3 cm) deep. Keeping the loaf on the parchment, place it onto the stone. Pour 1 cup of boiling water into the lower baking pan and quickly close the oven door.
- Bake for 10 minutes; remove the parchment, reduce the heat to 425 °F (220 °C), and bake for an additional 20-25 minutes, until deeply golden with a firm crust. The bottom should sound hollow when tapped.
Cool
- Let cool on a baking rack for at least 1 hour. Although tempting, if you cut it early, the crumb will likely compress.
Notes
- Walnuts: Make sure your walnuts are fresh. Toast them until golden brown and aromatic, and watch them closely to make sure they don't burn. Make sure to let them cool fully before adding to the dough
- Dough texture: The dough should feel soft, slightly tacky, and elastic enough to stretch a thin windowpane per the "Knead the dough" step.
- Gentle tension: The dough will rise higher if you shape it and build the tension gently rather than firmly.
- Perfect proofing: The dough has finished proofing when a gentle finger press springs back slowly, and the dough is soft and slightly domed.
- Scoring matters: Score the dough about ½ inch (1.3 cm) deep so the dough can expand cleanly and along the lines of your choosing.
- Baking options: A Dutch oven will yield the best bottom color and most consistent rise. A baking steel/stone will also yield a crisp crust and rustic look, but requires steaming.
- Cool fully: Cutting the bread before it's cooled for at least an hour compresses the crumb and makes it appear denser than it would if cut at room temperature.


Leave a Reply